Indoor Maps
I’ve created landscaping and utility data but haven’t done much with indoor maps. I delved into a few indoor mapping projects in university with the library floor plans, but there were some issues with data consistency and georeferencing that made it challenging.
Instead of going through the whole process of georeferencing a floorplan over a house on aerial imagery, I thought that this would be a fun experiment to try out a relative coordinate system that isn’t directly tied to the planet or in other words - a non-geographical coordinate system.
This is fundamentally similar to the Hubble Legacy Field project that I did but it goes a few steps further in creating more interactive features.
There are multiple ways this could be accomplished but I’m going to go step by step on how I created the following map using Leaflet:
Creating a Map
I started the map using this guide from the leaflet docs.
Default html code:
<!DOCTYPE html>
<html>
   <head>
      <style></style>
   </head>
   <script></script>
   <body></body>
</html>
We’ll add a title:
<title>Non Geographic Map</title>
some default html configs:
<meta charset="utf-8" />
<meta name="viewport" content="width=device-width, initial-scale=1.0">
<link rel="shortcut icon" type="image/x-icon" href="docs/images/favicon.ico" />
and the leaflet libraries:
<link rel="stylesheet" href="https://unpkg.com/leaflet@1.7.1/dist/leaflet.css" integrity="sha512-xodZBNTC5n17Xt2atTPuE1HxjVMSvLVW9ocqUKLsCC5CXdbqCmblAshOMAS6/keqq/sMZMZ19scR4PsZChSR7A==" crossorigin=""/>
<script src="https://unpkg.com/leaflet@1.7.1/dist/leaflet.js" integrity="sha512-XQoYMqMTK8LvdxXYG3nZ448hOEQiglfqkJs1NOQV44cWnUrBc8PkAOcXy20w0vlaXaVUearIOBhiXZ5V3ynxwA==" crossorigin=""></script>
Next we’ll add the map div
<div id='map'></div>
make the map full screen:
html, body {
	height: 100%;
	margin: 0;
}
#map {
	width: 100%;
	height: 100%;
}
}
initialize the map using a simple coordinate system:
var map = L.map('map', {
	crs: L.CRS.Simple,
	minZoom: 0,
});
This should be our full HTML code so far:
<!DOCTYPE html>
<html>
<head>

	<title>Non Geographic Map</title>

	<meta charset="utf-8" />
	<meta name="viewport" content="width=device-width, initial-scale=1.0">

	<link rel="shortcut icon" type="image/x-icon" href="docs/images/favicon.ico" />

	<link rel="stylesheet" href="https://unpkg.com/leaflet@1.7.1/dist/leaflet.css" integrity="sha512-xodZBNTC5n17Xt2atTPuE1HxjVMSvLVW9ocqUKLsCC5CXdbqCmblAshOMAS6/keqq/sMZMZ19scR4PsZChSR7A==" crossorigin=""/>
	<script src="https://unpkg.com/leaflet@1.7.1/dist/leaflet.js" integrity="sha512-XQoYMqMTK8LvdxXYG3nZ448hOEQiglfqkJs1NOQV44cWnUrBc8PkAOcXy20w0vlaXaVUearIOBhiXZ5V3ynxwA==" crossorigin=""></script>

<style>
	html, body {
		height: 100%;
		margin: 0;
	}
	#map {
		width: 100%;
		height: 100%;
	}
}
</style>

</head>

<body>

<div id='map'></div>

<script>

//define the map using a simple coordinate system

	var map = L.map('map', {
		crs: L.CRS.Simple,
		minZoom: 0,
	});

</script>

</body>
</html>
Adding Layers
It should show just a basic map window but we haven’t added anything to the map yet. Let’s create a polygon representing a building footprint and add it to the map. Since we aren’t using typical latitude longitude units I’m setting an arbitrary scale that one map unit = one foot. One important thing to note is that the default coordinate system for leaflet is (y, x) or longitude, latitude, rather than (x, y)
var L1footprint = L.polygon([
	[0,  0],
	[50.5,  0],
	[50.5, 17],
	[31.5, 17],
	[31.5, 19],
	[12, 19],
	[12, 17],
	[8, 17],
	[4, 17],
	[4, 13],
	[0, 13]
],
add some style
{color: 'black',
fillColor: 'white',
fillOpacity: 1}
add it to the map:
).addTo(map)
add a popup to your new feature:
.bindPopup("First Floor");;
we can calculate the center of the footprint and set the map to the middle when it first loads, variables are (y, x, zoom level)
map.setView([25.25, 9.5], 3);
this is the full HTML code so far:
<!DOCTYPE html>
<html>
<head>

	<title>Non Geographic Map</title>

	<meta charset="utf-8" />
	<meta name="viewport" content="width=device-width, initial-scale=1.0">

	<link rel="shortcut icon" type="image/x-icon" href="docs/images/favicon.ico" />

	<link rel="stylesheet" href="https://unpkg.com/leaflet@1.7.1/dist/leaflet.css" integrity="sha512-xodZBNTC5n17Xt2atTPuE1HxjVMSvLVW9ocqUKLsCC5CXdbqCmblAshOMAS6/keqq/sMZMZ19scR4PsZChSR7A==" crossorigin=""/>
	<script src="https://unpkg.com/leaflet@1.7.1/dist/leaflet.js" integrity="sha512-XQoYMqMTK8LvdxXYG3nZ448hOEQiglfqkJs1NOQV44cWnUrBc8PkAOcXy20w0vlaXaVUearIOBhiXZ5V3ynxwA==" crossorigin=""></script>

	<style>
		html, body {
			height: 100%;
			margin: 0;
		}
		#map {
			width: 100%;
			height: 100%;
		}
}
	</style>

</head>

<body>

<div id='map'></div>

<script>

//style

var footprintStyle = {
	color: 'black',
	fillColor: 'white',
	fillOpacity: 1
};

//define the map using a simple coordinate system

	var map = L.map('map', {
		crs: L.CRS.Simple,
		minZoom: 0,
	});

var L1footprint = L.polygon([
	[0,  0],
	[50.5,  0],
	[50.5, 17],
	[31.5, 17],
	[31.5, 19],
	[12, 19],
	[12, 17],
	[8, 17],
	[4, 17],
	[4, 13],
	[0, 13]
],
footprintStyle
).addTo(map).bindPopup("First Floor");;


	map.setView([25.25, 9.5], 3);

</script>

</body>
</html>
Adding a Full Screen Button
For this web application I also want to add a button to make the map full screen.
add fullscreen libraries:
	<link href='https://api.mapbox.com/mapbox.js/plugins/leaflet-fullscreen/v1.0.1/leaflet.fullscreen.css' rel='stylesheet' />
	<script src='https://api.mapbox.com/mapbox.js/plugins/leaflet-fullscreen/v1.0.1/Leaflet.fullscreen.min.js'></script>
initialize full screen button on the map:
map.addControl(new L.Control.Fullscreen());
Adding Layer Controls
If I have a building with multiple floors I could map them out side by side, but in this case I want to have a radio button that can be used to toggle between floors, it’s more scalable for buildings with multiple floors.
We’ll want to create the second floor first before we add the radio buttons.
	var L2footprint = L.polygon([
	[0,  0],
	[52,  0],
	[52, 17],
	[31, 17],
	[31, 19],
	[12, 19],
	[12, 17],
	[8, 17],
	[3, 17],
	[3, 13],
	[0, 13]
],footprintStyle
).bindPopup("2nd Floor");;
Now we’ll put these in a layer group since I will be adding more layers in the future.
var L1 = L.layerGroup([L1footprint]);
var L2 = L.layerGroup([L2footprint]);
Leaflet has two mechanisms in the layer controls, baseMaps and overlayMaps, (see docs from leaflet here, baseMaps will use radio buttons and the overlayMaps are generally for your toggle-able layers.
Now we’ll set the layers in our basemap control:
var baseMaps = {
	"Level 1": L1,
	"Level 2": L2
};
and initialize them on the map (note we took the .addTo(map) out of the L1Footprint variable because this is now being handled by the layer control)
L.control.layers(baseMaps).addTo(map);
We also want the map to open the first floor as a default so we will add this to our L.map code:
layers: [L1],
I want the layer control to be open by default, so I’ll make a slight modification to do that:
L.control.layers(baseMaps,null,{collapsed:false}).addTo(map);
With a little bit of rearranging, this is our full html file so far:
<!DOCTYPE html>
<html>
<head>

	<title>Non Geographic Map</title>

	<meta charset="utf-8" />
	<meta name="viewport" content="width=device-width, initial-scale=1.0">

	<link rel="shortcut icon" type="image/x-icon" href="docs/images/favicon.ico" />

	<link rel="stylesheet" href="https://unpkg.com/leaflet@1.7.1/dist/leaflet.css" integrity="sha512-xodZBNTC5n17Xt2atTPuE1HxjVMSvLVW9ocqUKLsCC5CXdbqCmblAshOMAS6/keqq/sMZMZ19scR4PsZChSR7A==" crossorigin=""/>
	<script src="https://unpkg.com/leaflet@1.7.1/dist/leaflet.js" integrity="sha512-XQoYMqMTK8LvdxXYG3nZ448hOEQiglfqkJs1NOQV44cWnUrBc8PkAOcXy20w0vlaXaVUearIOBhiXZ5V3ynxwA==" crossorigin=""></script>

	<link href='https://api.mapbox.com/mapbox.js/plugins/leaflet-fullscreen/v1.0.1/leaflet.fullscreen.css' rel='stylesheet' />
	<script src='https://api.mapbox.com/mapbox.js/plugins/leaflet-fullscreen/v1.0.1/Leaflet.fullscreen.min.js'></script>

<style>
	html, body {
		height: 100%;
		margin: 0;
	}
	#map {
		width: 100%;
		height: 100%;
	}
}
</style>

</head>

<body>

<div id='map'></div>

<script>

//style

var footprintStyle = {
	color: 'black',
	fillColor: 'white',
	fillOpacity: 1
};

var L1footprint = L.polygon([
	[0,  0],
	[50.5,  0],
	[50.5, 17],
	[31.5, 17],
	[31.5, 19],
	[12, 19],
	[12, 17],
	[8, 17],
	[4, 17],
	[4, 13],
	[0, 13]
],
footprintStyle
).bindPopup("First Floor");;

var L2footprint = L.polygon([
	[0,  0],
	[52,  0],
	[52, 17],
	[31, 17],
	[31, 19],
	[12, 19],
	[12, 17],
	[8, 17],
	[3, 17],
	[3, 13],
	[0, 13]
],footprintStyle
).bindPopup("2nd Floor");;

var L1 = L.layerGroup([L1footprint]);
var L2 = L.layerGroup([L2footprint]);

var baseMaps = {
	"Level 1": L1,
	"Level 2": L2
};

//define the map using a simple coordinate system

var map = L.map('map', {
		crs: L.CRS.Simple,
		minZoom: 0,
		layers: [L1],
	});

// set view at center, zoom level 3
	map.setView([25.25, 9.5], 3);

// add fullscreen button
	map.addControl(new L.Control.Fullscreen());

// add layer control
	L.control.layers(baseMaps,null,{collapsed:false}).addTo(map);

</script>

</body>
</html>
Adding a Sidebar
Next lets implement a sidebar that will popup when we click on a layer. I’m using the leaflet-sidebar plugin
add the libraries:
<link rel="stylesheet" href="https://cdn.jsdelivr.net/gh/Turbo87/leaflet-sidebar/src/L.Control.Sidebar.css" />
<script src="https://cdn.jsdelivr.net/gh/Turbo87/leaflet-sidebar/src/L.Control.Sidebar.js"></script>
we’ll need a div:
<div id="sidebar"></div>
we’ll want to put in some css for the image we’ll be adding to our sidebar div
.imgclass {
	display: block;
	max-width:400px;
	max-height:400px;
	width: auto;
	height: auto;
}
Now we’ll add some code to each layer to tell the map to pop up the side bar when you click on a feature and fill the div with some text and a picture:
.on('click', function () {
sidebar.show()
sidebar.setContent('<h1>First Floor</h1>' + '<img src="https://cdn.decoist.com/wp-content/uploads/2020/02/Beautiful-small-white-living-room-blends-monochromatic-beauty-with-modernity-53868.jpg" + " class=imgclass " />');;
});
One issue that comes up is the sidebar will stay initialized even when you switch floors, so we’ll add the following to tell it to close the side bar when someone switches floors:
//hide sidebar when floor level is changed
map.on('baselayerchange', function(e) {
	sidebar.hide();
	console.log(e);
});
Then we’ll initialize it on the map to popup on the right side and add a close button
var sidebar = L.control.sidebar('sidebar', {
	closeButton: true,
	position: 'right'
});
map.addControl(sidebar);
there is a bug where the close button is rendered too low so it isn’t visible but it’s easily fixed by increasing the z index in the L.Control.Sidebar.css file to 1000
.leaflet-sidebar .close {
	z-index: 1000;
}
The Final Map:
Put everything together and this is the fully functional html file
<!DOCTYPE html>
<html>
<head>

	<title>Non Geographic Map</title>

	<meta charset="utf-8" />
	<meta name="viewport" content="width=device-width, initial-scale=1.0">

	<link rel="shortcut icon" type="image/x-icon" href="docs/images/favicon.ico" />

	<link rel="stylesheet" href="https://unpkg.com/leaflet@1.7.1/dist/leaflet.css" integrity="sha512-xodZBNTC5n17Xt2atTPuE1HxjVMSvLVW9ocqUKLsCC5CXdbqCmblAshOMAS6/keqq/sMZMZ19scR4PsZChSR7A==" crossorigin=""/>
	<script src="https://unpkg.com/leaflet@1.7.1/dist/leaflet.js" integrity="sha512-XQoYMqMTK8LvdxXYG3nZ448hOEQiglfqkJs1NOQV44cWnUrBc8PkAOcXy20w0vlaXaVUearIOBhiXZ5V3ynxwA==" crossorigin=""></script>

	<link href='https://api.mapbox.com/mapbox.js/plugins/leaflet-fullscreen/v1.0.1/leaflet.fullscreen.css' rel='stylesheet' />
	<script src='https://api.mapbox.com/mapbox.js/plugins/leaflet-fullscreen/v1.0.1/Leaflet.fullscreen.min.js'></script>


	<link rel="stylesheet" href="https://cdn.jsdelivr.net/gh/Turbo87/leaflet-sidebar/src/L.Control.Sidebar.css" />
	<script src="https://cdn.jsdelivr.net/gh/Turbo87/leaflet-sidebar/src/L.Control.Sidebar.js"></script>

<style>
	html, body {
		height: 100%;
		margin: 0;
	}
	#map {
		width: 100%;
		height: 100%;
	}
	.imgclass {
		display: block;
		max-width:400px;
		max-height:400px;
		width: auto;
		height: auto;
	}
	.leaflet-sidebar .close {
		z-index: 1000;
	}
}
</style>

</head>

<body>

<div id='map'></div>

<div id="sidebar"></div>

<script>

//style

var footprintStyle = {
	color: 'black',
	fillColor: 'white',
	fillOpacity: 1
};

var L1footprint = L.polygon([
	[0,  0],
	[50.5,  0],
	[50.5, 17],
	[31.5, 17],
	[31.5, 19],
	[12, 19],
	[12, 17],
	[8, 17],
	[4, 17],
	[4, 13],
	[0, 13]
],
footprintStyle
).on('click', function () {
sidebar.show()
sidebar.setContent('<h1>First Floor</h1>' + '<img src="https://cdn.decoist.com/wp-content/uploads/2020/02/Beautiful-small-white-living-room-blends-monochromatic-beauty-with-modernity-53868.jpg" + " class=imgclass " />');;
});;

var L2footprint = L.polygon([
	[0,  0],
	[52,  0],
	[52, 17],
	[31, 17],
	[31, 19],
	[12, 19],
	[12, 17],
	[8, 17],
	[3, 17],
	[3, 13],
	[0, 13]
],footprintStyle
).on('click', function () {
sidebar.show()
sidebar.setContent('<h1>Second Floor</h1>' + '<img src="https://cdn.decoist.com/wp-content/uploads/2020/02/Beautiful-small-white-living-room-blends-monochromatic-beauty-with-modernity-53868.jpg" + " class=imgclass " />');;
});;

var L1 = L.layerGroup([L1footprint]);
var L2 = L.layerGroup([L2footprint]);

var baseMaps = {
	"Level 1": L1,
	"Level 2": L2
};

//define the map using a simple coordinate system

var map = L.map('map', {
		crs: L.CRS.Simple,
		minZoom: 0,
		layers: [L1],
	});

// set view at center, zoom level 3
	map.setView([25.25, 9.5], 3);

// add fullscreen button
	map.addControl(new L.Control.Fullscreen());

//hide sidebar when floor level is changed
map.on('baselayerchange', function(e) {
	sidebar.hide();
	console.log(e);
});

var sidebar = L.control.sidebar('sidebar', {
	closeButton: true,
	position: 'right'
});
map.addControl(sidebar);

// add layer control
	L.control.layers(baseMaps,null,{collapsed:false}).addTo(map);

</script>

</body>
</html>
If you’ve never coded before it can be a bit daunting to start but I find it’s easier for me to have an idea of what I want to accomplish and then break it up into step by step pieces to accomplish that goal. My code is far from ideal and can be optimized with functions to remove code duplication but at the end of the day I have a working project that does what I wanted it to do.
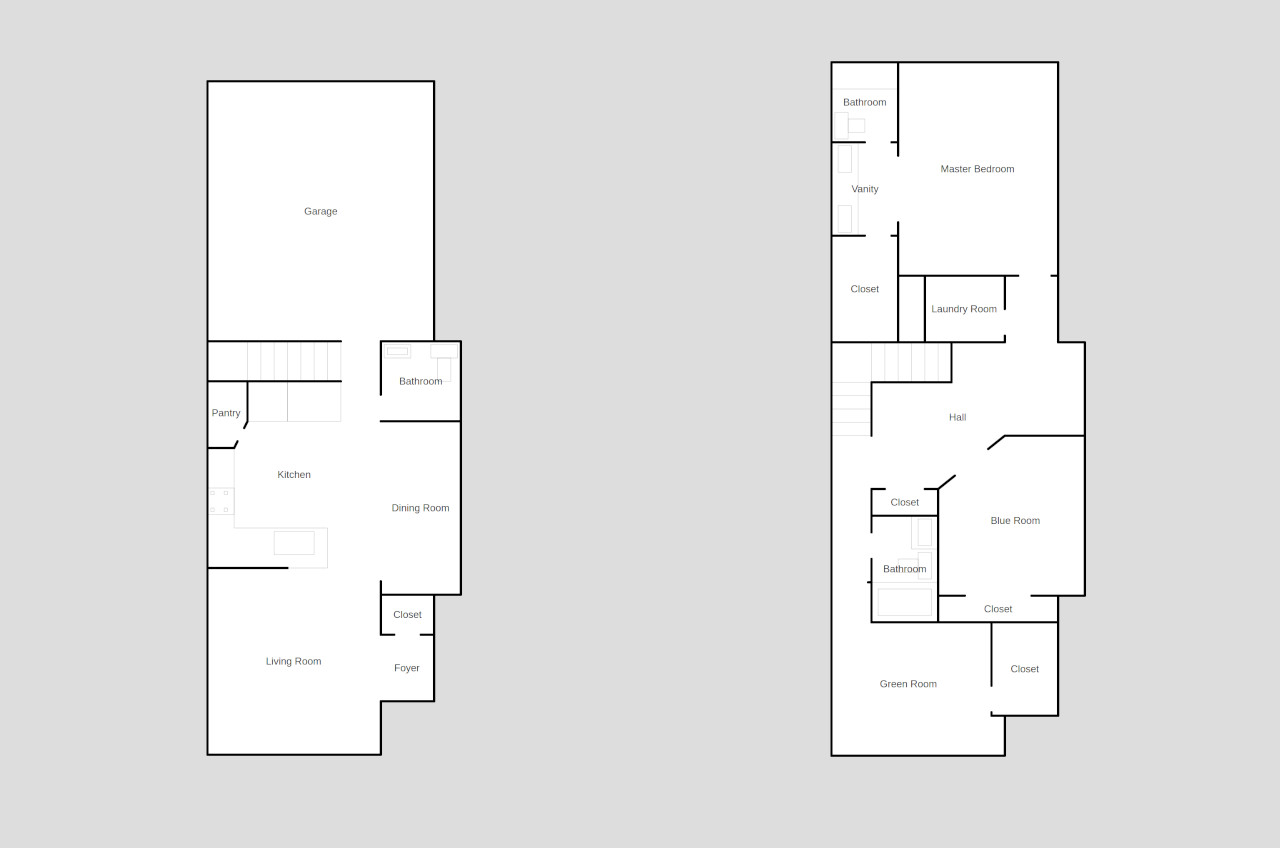
This should provide pretty much everything you need to adapt it to your own floorplans or data sets. I added a bit more detail including walls, rooms, highlights and more. The source code can be found at my repository here